KVM GPU Setup for NVIDIA GPUs: Passthrough & Display on Host
Virtualization helps all users to enhance their hardware by running many virtual machines (VMs) together on a single physical host. For AI-based tasks, modern gaming, or GPU-heavy apps such as an AI image generator, having GPU access inside a virtual machine is very important. This is the case where a KVM GPU setup utilizing passthrough in QEMU/KVM stands out.
In this comprehensive knowledge base, we’ll just take you through how to configure a KVM GPU setup, especially for passthrough, and make the guest GPU output displayed on your host display. Even if you are utilizing an NVIDIA A100, a GPU dedicated server, or a GPU cluster from GPU4HOST, this whole guide is customized to help you get GPU passthrough working successfully.
What is GPU Passthrough?
GPU passthrough basically is a method that helps a virtual machine to directly utilize a physical GPU by passing it from the host system. The VM gets complete GPU access, making it a perfect option for performance-intensive workloads such as:
- ML and AI GPU workloads
- 3D graphics rendering
- Modern gaming
- Video editing
- Running an AI image generator
Prerequisites for KVM GPU Setup
Before deeply diving into the KVM GPU setup, make sure that you have the following:
Hardware Needs:
- A CPU along with VT-d (Intel) or AMD-Vi (AMD) support
- A discrete GPU proficient in passthrough (NVIDIA or AMD)
- UEFI BIOS simply with IOMMU and virtualization enabled
Software Needs:
- A Linux host, along with KVM/QEMU installed (Fedora/Ubuntu/Arch preferred).
- virt-manager for GUI setup (optional).
- A secondary GPU for the host if you are passing through the main one.
Step-by-Step KVM GPU Setup
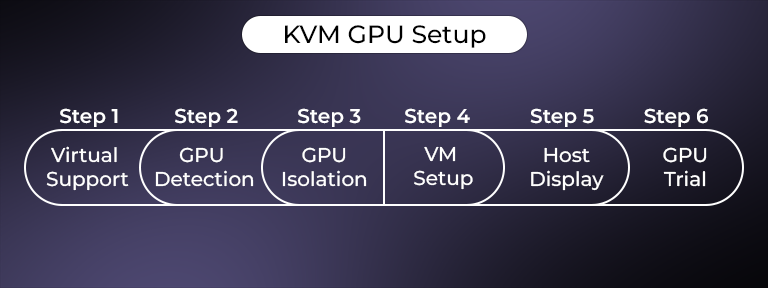
Let’s just break down the KVM GPU setup procedure into fully manageable steps.
Step 1: Check Virtualization Support
Run the below-mentioned command to check for virtualization add-ons:
egrep -c ‘(vmx|svm)’ /proc/cpuinfo
You should also see a value that is more than 0.
Allow IOMMU in the GRUB setup:
For AMD:
GRUB_CMDLINE_LINUX_DEFAULT=”quiet amd_iommu=on”
For Intel:
GRUB_CMDLINE_LINUX_DEFAULT=”quiet intel_iommu=on”
Just update GRUB & reboot:
sudo update-grub
sudo reboot
Step 2: Check GPU Devices
Identify your GPU and its related IOMMU group:
lspci -nnk | grep -iA2 VGA
Note the PCI IDs of the GPU and related HDMI/audio devices.
Step 3: Isolate the GPU
Utilize vfio-pci to bind the GPU to the VM. Include the GPU PCI IDs in/etc/modprobe.d/vfio.conf:
options vfio-pci ids=10de:1db6,10de:10f0
Simply replace the IDs with those of your GPU.
Include in /etc/modules:
vfio
vfio_iommu_type1
vfio_pci
vfio_virqfd
Update initramfs & then reboot:
sudo update-initramfs -u
sudo reboot
This fully prepares your KVM GPU setup for passthrough.
Step 4: Create the Virtual Machine
You can easily utilize virt-manager or virsh.
With the help of virt-manager:
- Open virt-manager
- Create a new VM
- Select the “Custom Configuration” option.
- Set UEFI firmware (OVMF)
- Include PCI Host Device—choose your GPU and its audio device.
With the help of QEMU (CLI):
qemu-system-x86_64 \
-enable-kvm \
-cpu host,kvm=off \
-m 8192 \
-device vfio-pci,host=01:00.0 \
…
Replace 01:00.0 simply with your PCI address of the GPU.
Step 5: Display GPU Result on Host
You have two well-known options to display the GPU result on the host:
Option 1: Pass the monitor directly
Link your monitor to the passed-through GPU. Once the virtual machine boots, it will take over the whole display.
Option 2: Utilize Looking Glass (Advanced)
Opting Glass helps share the GPU’s result back to the host in a specific window.
- Needs a shared memory buffer between both the guest and host.
- Install the client on the host and the service in the guest.
- Perfect for GPU hosting situations where remote access is required.
Step 6: Test the virtual machine with GPU Passthrough
Install all GPU drivers required inside the VM (Linux or Windows). Check if the GPU is found.
For Windows:
- Install NVIDIA/AMD drivers
- Verify Device Manager
For Linux:
nvidia-smi
If your KVM GPU setup is appropriate, your VM should now have complete admin access to the passed-through GPU.
Real-World Use Cases for KVM GPU Setup
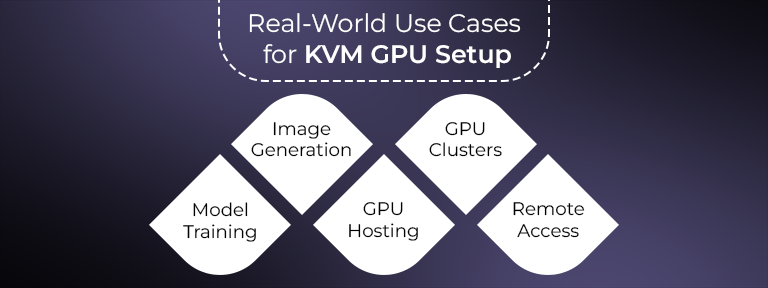
- AI Model Training: Run PyTorch or TensorFlow on a VM simply with NVIDIA V100 or a similar type of GPU.
- AI Image Generator: Pass through the GPU to create images in seconds.
- GPU Server Hosting: Let clients isolate GPU access with the help of VMs.
- GPU Clusters: Create flexible GPU-based VMs in a GPU cluster environment.
- Remote Desktop: High-end remote desktops for creators and developers.
Security Considerations
- Utilize a dedicated GPU for passthrough to prevent host issues.
- Enable virtio and vfio security to sandbox the virtual machine.
- Limit all user access on multi-tenant GPU hosting environments.
Why GPU4HOST for KVM GPU Setup?
GPU4HOST offers a cutting-edge GPU server, consisting of:
- GPU dedicated server options with complete passthrough support
- Pre-setup KVM environments
- Quick access to NVIDIA A100, V100, and a lot more
- Flexible GPU hosting, along with cluster support
- 24/7 expert support for advanced use cases such as AI model training and image generation
With the help of GPU4HOST, setting up and running your KVM GPU setup is a lot easier, quicker, and highly enhanced.
Final Thoughts
Learning about KVM GPU setup, especially for passthrough in QEMU, is a complete game-changer—even if you are building a GPU-based VM for AI-powered tasks, modern gaming, or an AI image generator. This whole process, while a technical part, gives you exceptional control over hardware virtualization.
Ranging from setting up IOMMU to choosing the appropriate PCI device and handling display results, every single step helps you get the complete potential of your GPU server.
If you are opting for smooth deployment, high-end AI GPU proficiencies, or cluster-ready infrastructure, GPU4HOST is your go-to platform.