
A Guide to Enable GPU or Change Aspect Ratio in Safe Mode
When dealing with display problems, system crashes, or driver issues, simply booting your system into Safe Mode is basically the very first step in resolving them. However, in Safe Mode, your system generally disables cutting-edge display settings, consisting of the GPU. For experts utilizing a GPU server, an AI GPU, or a GPU dedicated server hosting environment, this can be a noteworthy barrier. This knowledge base takes you through practical steps to enable GPU or change the aspect ratio while in Safe Mode, guaranteeing your visual and computational settings are advanced—even in the case of minimal environments.
What Is Safe Mode & Why Is the GPU Disabled?
Safe Mode is generally a diagnostic mode of a computer OS. It simply loads only the necessary drivers and services, which states that your GPU (graphics processing unit) is usually disabled or switched to a default Microsoft display adapter. This is completely intentional to simply help isolate software or hardware problems without interference from GPU drivers.
But if you are utilizing a GPU server, a GPU dedicated server, or any type of AI image generator that relies mainly on graphics acceleration, not having complete access to the GPU can stop your work.
Why You Might Need to Enable GPU in Safe Mode
- To reset the display resolution or aspect ratio
- To restore or roll back a faulty GPU driver
- To resolve GPU-powered applications such as AI image generators
- To troubleshoot problems in environments like GPU hosting or Nvidia A100-based clusters
Step-by-Step: How to Enable GPU in Safe Mode
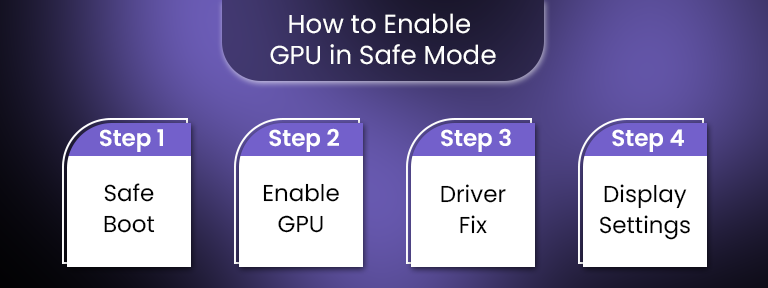
Let’s just go through all the steps to enable GPU in Safe Mode:
Step 1: Simply, Boot into Safe Mode with Networking
- Press the Win + R keys, just type msconfig, and press the Enter button.
- Under the tab named “Boot”, check “Safe boot” and choose “Network.”
- Click OK and just restart your system.
Why networking? It helps you to easily access Windows Update or online drivers for your AI server or GPU cluster, if required.
Step 2: Utilize Device Manager to Manually Enable GPU
- Open Device Manager (press Win + X → choose Device Manager).
- Expand the “Display Adapters” segment.
- Right-click on the GPU (for example, the Nvidia A100 or the added GPU) and choose Enable Device.
If the GPU is enabled by now, try Update Driver and manually select from a compatible driver list.
Step 3: Install or Roll Back GPU Driver
- If your screen resolution is just turned off or your aspect ratio is not right, the problem might be a faulty driver.
- To roll back:
- Go to Device Manager → simply right-click on your chosen GPU → Properties.
- Go to the Driver tab and click Roll Back Driver if accessible.
- To reinstall:
- Uninstall the present driver.
- Restart in Safe Mode along with Networking.
- Download the right driver from the manufacturer’s site or with the help of Windows Update.
This is very important for performance-powered setups such as GPU4HOST, where system productivity is paramount.
Step 4: Change Aspect Ratio or Resolution in Safe Mode
Once you enable GPU, you can easily make changes in the display settings:
- Right-click on the desktop and select the Display Settings option.
- Scroll down to “Display resolution” and choose the right ratio.
- 4:3 for legacy displays
- 16:9 for widescreens
- You may also have full access to advanced display settings to refine refresh rate and display adapter properties.
For all those who are using GPU hosting or a GPU server, this significant step can be very helpful in terms of remote visualization or virtual machine displays.
Advanced Fix: Enable GPU via Command Line
If you can’t access GUI tools:
- Just boot into Safe Mode with the help of the Command Prompt.
- Type:
devmgmt.msc
This will open Device Manager in GUI mode.
- Utilize devcon.exe (Device Console) if you have it already installed:
devcon enable “PCI\VEN_10DE&DEV_1DB6”
(Just replace it with your GPU’s hardware ID)
This is very useful in automated environments such as a GPU cluster, where manual GUI access isn’t workable.
Real-World Use Case: AI Image Generators in Safe Mode
AI tools like Midjourney, DALL·E, or personalized AI image generators need GPU acceleration. In situations where the system crashes just because of a driver issue, accessing all these tools in Safe Mode can help isolate problems.
On a well-known platform like GPU4HOST or a GPU dedicated server, making sure that the GPU is enabled—even in restricted boot modes—can help for constant experimentation, development, or even high-quality rendering with decreased assets.
Best Practices for a GPU Server & Safe Mode Configurations
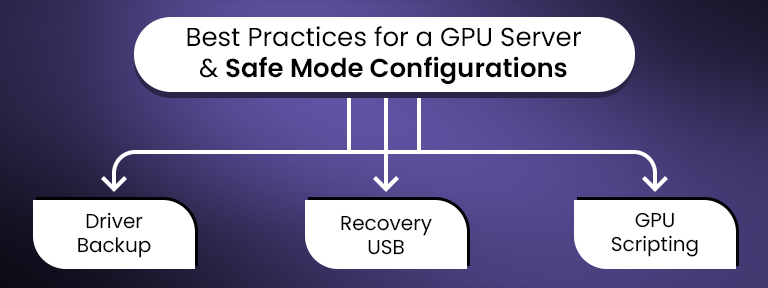
- Always have proper backup versions of stable GPU drivers.
- Maintain an isolated bootable recovery USB with the required drivers for Nvidia A100, AI GPU, or the same type of hardware.
- If working on a GPU cluster, just script the Enable GPU process for the remote fallback processes.
Common Errors and Fixes
| Error | Solution |
| “Display driver failed to start.” | Reinstall the latest GPU driver in Safe Mode |
| Black screen after enabling the GPU | Restart in Safe Mode & disable the GPU temporarily |
| Resolution stuck at 800×600 | Change the aspect ratio and update the GPU driver |
| GPU not discovered in Device Manager | Utilize Scan for hardware changes or check BIOS settings |
Final Thoughts: Enable GPU for Stability & Performance
Even if you are troubleshooting a local display problem or handling a GPU hosting environment such as GPU4HOST, knowing how to enable GPU in Safe Mode is a demanded skill. It always gives you full control to fix, set up, and improve your system in limited environments. Mainly for all those who are working on AI GPU tasks, a GPU server, or GPU clusters, this practical proficiency ensures that downtime is very low and performance is accelerated—even in the case of diagnostic modes.